
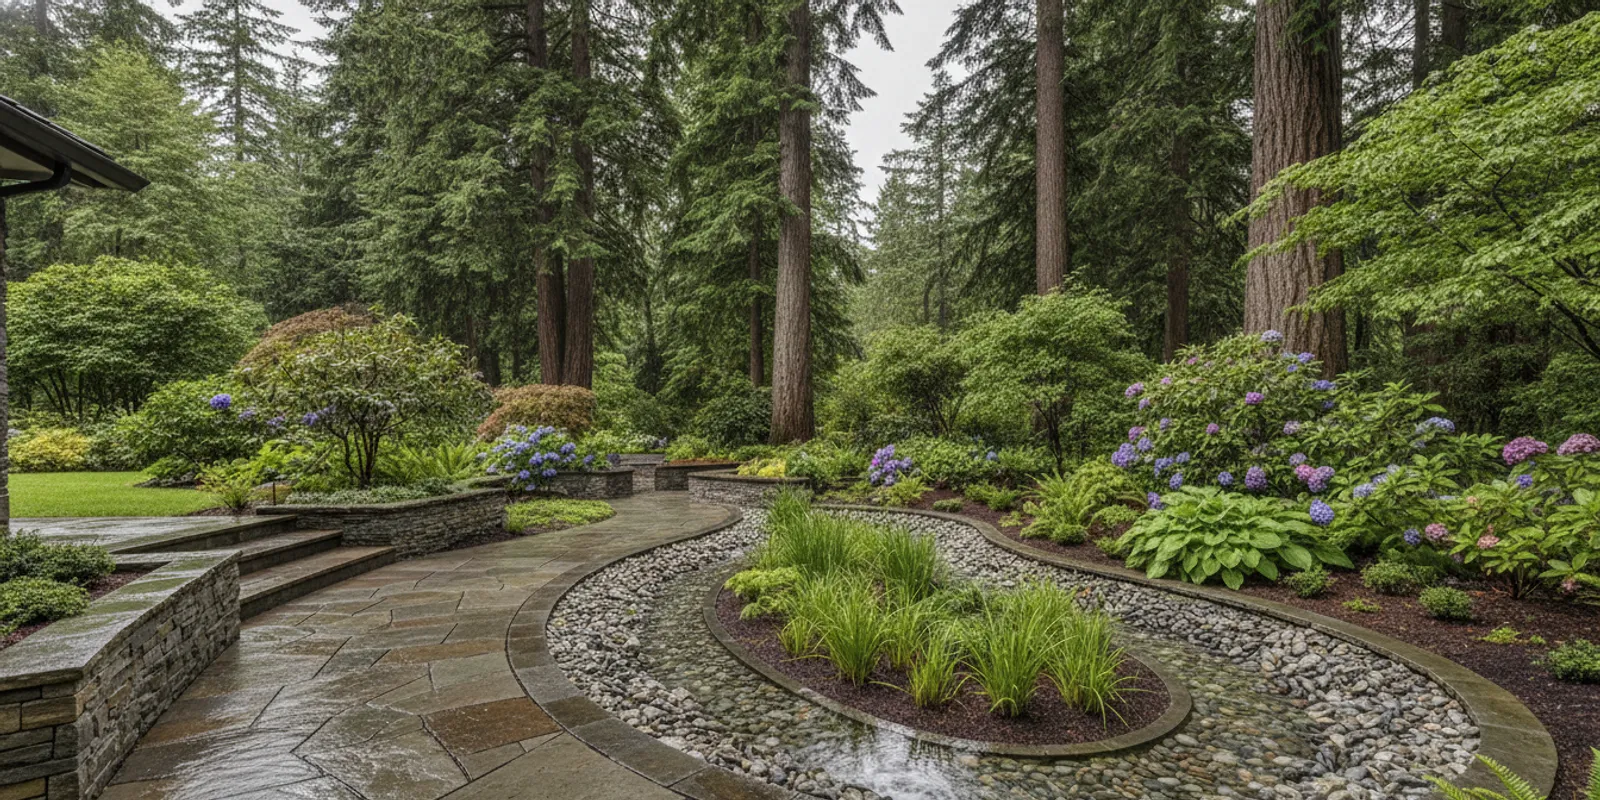
A bioswale is a shallow, planted channel that slows stormwater runoff and guides it toward a suitable place to soak into the ground or continue safely through a drainage system. For homeowners researching bioswale design Pacific Northwest properties can use, the key is matching the channel to the site: its slope, soil, water sources, and outlet all matter. A thoughtful plan can make drainage part of a cohesive yard rather than an afterthought. If you are planning a larger outdoor transformation, explore remote landscape design and sustainable outdoor living as a starting point.
Ready to plan a drainage-conscious landscape? Call ShellScapes at (206) 565-5984 or contact us to discuss your project.
What is a bioswale and how does it work?
A bioswale is a gently sloped, vegetated depression designed to collect and convey runoff at a controlled pace. Rain flows from a surface such as a roof, driveway, or path into the swale. Its shape and planting help slow the flow, while the soil and vegetation support infiltration and filtering. If the ground cannot absorb all the water, a properly planned route carries the excess toward an appropriate outlet.
Think of it as a landscape feature with a drainage job. It is not simply a ditch filled with plants, and it should not be treated as a guaranteed fix for every wet yard. Its performance depends on the contributing area, soil conditions, slope, water volume, and what happens when the swale is full. The route water takes beyond the feature matters as much as the planting inside it.
A typical bioswale plan considers these parts:
- Inlet: The point where runoff enters, often from a downspout, paved area, or shallow surface flow. The entry should not erode or send water onto a neighboring property.
- Channel and side slopes: A broad, shallow form can slow water more gently than a narrow, steep trench. The shape must suit the available space and the site’s grade.
- Planting and soil: Plants should tolerate the expected wet and dry conditions. Soil and any specified amendments need to suit the design and local conditions.
- Overflow or outlet: A planned route for excess water helps prevent ponding where it is not intended or uncontrolled flow toward structures.
The goal is not necessarily to make every drop disappear on site. The goal is to manage runoff deliberately and safely, using a feature that fits the property. Washington State Department of Ecology stormwater manuals provide guidance on planning, design, and implementation of stormwater features; use that technical guidance alongside a site-specific assessment rather than treating any one detail as universal. Read the Washington Department of Ecology stormwater manuals.
Why are bioswales useful for Pacific Northwest rain patterns?
Many Pacific Northwest yards have to accommodate wet periods, seasonal shifts, and compacted or sloping areas where runoff moves quickly across the surface. Roofs, driveways, and patios add hard surfaces that can send water to low points. On a property with a visible flow path, a bioswale may help guide that water through the landscape at a more controlled pace.
That does not mean every yard needs a bioswale. Before choosing one, notice what happens during and after rain. Does water run toward a doorway, collect beside a path, cross a driveway, or leave a bare channel in a slope? Is a downspout discharging to a spot that stays saturated? Those clues can help identify a drainage concern, but they do not establish its cause. A grading issue, a blocked drain, an unsuitable soil condition, or a foundation concern may call for a different response.
For a first site review, make a simple runoff map:
- Mark the roof edges, downspouts, paved surfaces, and areas where water visibly enters the yard.
- Note the direction water travels during rainfall and where it gathers or exits.
- Record slopes, retaining walls, steps, large trees, and areas you need to keep accessible.
- Look for erosion, prolonged saturation, or water near buildings, and note when and where it occurs.
- Identify a potential destination for overflow before deciding where a channel should go.
This is observation, not a substitute for checking site conditions. Do not assume that directing water into a low area is safe simply because it is lower. Water should not be diverted onto a neighboring property or toward a building. Where runoff is close to a foundation, creates persistent flooding, or appears to affect a slope, consult an appropriate drainage professional before beginning landscape work.
Want to coordinate drainage with a larger yard plan? Contact ShellScapes to discuss the site’s conditions, outdoor uses, and design goals.
A bioswale can also support a design that treats drainage as part of the outdoor experience. Its planted form can connect a paved area to a garden, soften a transition, or give an existing low corridor a clear purpose. For ideas on coordinating landscape elements with regional site conditions, see Pacific Northwest landscape design for climate-ready yards. The goal here is narrower: understanding and planning the runoff feature itself.
Bioswale vs. rain garden: which is right for your yard?
A bioswale is generally shaped to convey water along a defined path, while a rain garden is generally a planted depression that collects runoff and allows it to infiltrate. The terms and designs can overlap: a swale may include a planted basin, and a rain garden may receive water through a shallow channel. The right choice depends on where water comes from, whether it needs to move through the site, and what the soil and available space can support.
| Consideration | Bioswale | Rain garden |
|---|---|---|
| Main role | Slows and conveys runoff along a planned route. | Collects runoff in a planted depression for infiltration and temporary storage. |
| Typical shape | Elongated and gently graded, with an inlet and a planned outlet or overflow. | A basin-like planted area sized and placed for its contributing drainage area. |
| When it may fit | When water needs to travel from one part of the property to another. | When a suitable location can receive runoff and the site can accommodate a planted basin. |
| Key planning question | Where will the water go if the channel carries more than the soil can absorb? | Can the location manage incoming water without unwanted ponding or impacts nearby? |
Use the table as a way to frame the conversation, not as a construction specification. Neither feature should be sized by appearance alone. A small, attractive depression may not be appropriate for a large contributing area, and a long swale can move more water than a site can safely receive. Soil infiltration, grade, utilities, proximity to structures, and local requirements can change the design.
In some yards, neither option is the right first move. A downspout extension, a change to surface grading, a repaired drain, or another engineered approach may better address the problem. If you are also comparing hardscape layouts, the local considerations in this Bainbridge Island hardscaping planning guide can help you think through how paths and paved areas fit the site. Keep drainage decisions tied to the actual flow of water rather than choosing a feature because it is popular.
Which plants thrive in a PNW bioswale?
There is no universal plant list for a Pacific Northwest bioswale. A plant must suit both the wettest conditions it will experience and the periods when the soil dries out. It also needs to fit the amount of sun, soil, space, and maintenance a homeowner can provide. The upper edge of a swale may be drier than its lowest point, so one uniform planting palette may not suit the whole feature.
Instead of selecting by name first, sort planting zones by conditions:
- Inlet and lower channel: Prioritize plants able to handle occasional concentrated flow and shifting moisture. The inlet may need extra protection from erosion, not just attractive foliage.
- Lower basin or low point: Look for plants suited to soil that stays moist longer, while avoiding assumptions that it will remain wet all year.
- Side slopes and upper edges: Choose plants that can handle more drainage and help keep soil covered. Their mature size should not block access or interfere with sightlines.
- Transitions to existing beds: Repeat compatible textures or colors from nearby planting so the feature feels integrated, while preserving the swale’s intended flow path.
Native and regionally appropriate species can be strong candidates, but “native” by itself does not mean a plant will thrive in every swale. Match each selection to the precise site and hydrology. Consider mature height and spread, root behavior, seasonal appearance, and how easy it will be to remove debris or inspect the channel. Avoid plants that could obstruct inlets or hide signs of erosion and standing water.
Planting is part of function, but it does not replace sound grading or an overflow plan. Even well-chosen vegetation cannot compensate for an undersized channel, a poorly placed inlet, or water directed to the wrong destination. For a broader look at coordinating planting and drainage within a yard, read how a Seattle landscape design moves from goals to build plans.
How do you integrate a bioswale into your landscape design?
Start with the site and the water, then shape the design around them. A bioswale should not be dropped into a finished plan as a decorative trench. It needs to work with the property’s grading and paved surfaces, while leaving room for circulation, planting, and the outdoor uses that matter to you.
1. Define the problem before choosing the feature
Write down what you want to address: runoff crossing a walkway, water gathering in a particular spot, erosion, or a downspout discharge that needs a better route. Note when the problem happens and what surfaces appear to contribute water. If you are unsure whether it is a surface-water issue or a more serious drainage concern, get qualified advice before changing grades.
2. Map the site and likely water route
Document slope, hard surfaces, roof drainage, existing drains, trees, retaining features, and the areas you want to preserve. Identify where water can enter a swale and where it could safely leave or overflow. The planned route should account for more than ordinary rainfall: consider what happens when the feature is already saturated or receives more runoff than expected.
3. Check constraints and technical needs
Confirm property boundaries, underground utilities, local codes or permit requirements, and any site-specific restrictions before excavation. Soil and infiltration conditions should be evaluated for the intended application. The Washington State Department of Ecology manual cited above is a technical reference, but it should not be treated as a substitute for applicable local requirements or project-specific engineering. When in doubt, involve the relevant local authority or a qualified professional.
4. Coordinate the swale with paths and hardscape
Decide how people will move through the space and how the swale meets walkways, patios, or driveways. Keep crossings intentional and make sure paving does not accidentally funnel runoff into a place that cannot handle it. Materials and edges should work with the grade and drainage plan. For a related look at coordinating constructed elements with the property, see this guide to choosing a hardscape contractor on Bainbridge Island.
5. Plan planting, overflow, and access together
Choose plants by moisture zone and leave access to the inlet and outlet for inspection. Make overflow visible in the plan, not an assumption made on installation day. Consider where sediment and leaves may collect and how you will remove them. A well-integrated feature is easy to understand and maintain because its route and edges are legible.
6. Review the whole project before construction
Look at the proposed feature in context: how it appears from the house, what it does during rain, how it connects to adjacent spaces, and whether water has a safe path at every stage. A design plan can help coordinate grading, planting, and hardscape decisions before work begins. ShellScapes offers online landscape design for sustainable outdoor living; its design fee is included in the construction quote when ShellScapes handles installation. Discuss the site and project scope to determine what kind of planning is appropriate.
A bioswale should be one piece of a considered landscape plan, not an isolated solution. If you are weighing a defined runoff route against a basin, want to coordinate drainage with a larger outdoor project, or are unsure what your site needs, review local hardscaping considerations and bring your observations to a project conversation.
Ready to discuss your site? Call ShellScapes at (206) 565-5984 or contact us before choosing a drainage feature.
Frequently Asked Questions
Does a bioswale hold water all the time?
Not necessarily. A bioswale is designed to manage runoff, and conditions vary with soil, rainfall, grading, and its outlet. If water remains in an area longer than expected, the cause may need investigation; do not assume persistent ponding is normal or that adding plants will solve it.
Can I put a bioswale beside my house?
Do not place or route water near a building without checking the site and applicable guidance. The right separation and drainage approach depend on the property, soils, foundation, and local requirements. Get qualified advice if water is already collecting near a structure.
Is a bioswale the same as a French drain?
No. A bioswale is a visible, planted surface feature that slows and guides runoff. A French drain is a subsurface drainage approach, typically using a gravel-filled trench and perforated pipe. One is not automatically a replacement for the other; the source and route of water determine which solution may be suitable.
Can an existing lawn or garden be converted into a bioswale?
Possibly, but first confirm where runoff comes from, what grades are feasible, whether soil can handle the intended flow, and where excess water will go. The conversion may also affect paths, planting, utilities, or neighboring areas. A site review can reveal whether a bioswale or a different drainage measure makes more sense.
What is the first step in planning one?
Observe the property during rain and map the surfaces, flow paths, and problem areas. Then have the site conditions and potential outlet reviewed before settling on a design. That sequence helps keep the feature grounded in how the yard actually handles water.
Good bioswale design begins with a clear understanding of where water enters, how it moves, and where it can safely go. With those conditions in view, the feature can be planned to support both the function and character of a Pacific Northwest landscape.